Autofill
Excel’s autofill function allows the user to quickly fill cells with similar data and formulas.
Step 1: Choose a cell with the desired data or formula, and activate it.

Step 2: Click the handle, the black box in the bottom right hand corner, and drag it over the cells that you want to autofill. Excel will sometimes generate a popup “hint” indicating what it will fill the cells with.
Step 3: Release your cursor. Excel will have continued the pattern of your previously selected cells.
Another way to autofill: If you are applying a formula or function to a column of data, you can double click on the small box at the bottom right corner of the cell that includes the formula/function, and it will autofill down to the end of the column containing the data.
Remember that autofill works differently with statically referenced data and cell addressed data. For more information about how this affects autofilling, check out the Data or Formulas & Functions sub chapters.
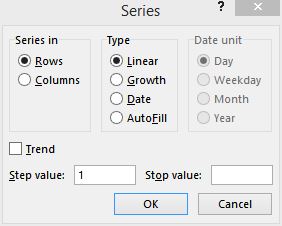
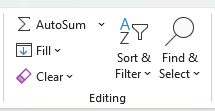
If Excel is not filling the area the way you’d like, select the range of cells you want to fill and from the Home Ribbon choose Editing ->Fill ->Series.
When you release, the Fill Series window will appear. Choose the direction you want your data to fill the range (up, down, left, right). Then choose the kind of series to create.
- Formulas will fill in each cell of the range with the original formula.
- Linear will fill in each cell of the range with the next increment in the linear series (1,2,3,4,…).
- Growth will fill in each cell of the range with the next increment in the growth series (1,2,4,8,…).
- Date will fill in each cell of the range with the next increment in the calendar.